Hiển thị các bài đăng có nhãn Tutorial. Hiển thị tất cả bài đăng

Thứ Tư, 13 tháng 10, 2010

Zend Framework cho người mới bắt đầu

A- Tìm hiểu cách làm việc ZF:

ZF được xem là một trong những framework phổ biến và có sức mạnh rất lớn so với mặt bằng chung các Framework đang có mặt hiện nay. Tuy nhiên, để sử dụng thành thạo được ZF. Người sử dụng phải có những hiểu biết nhất định về các khái niệm mô hình ba lớp M-V-C, kiến thức PHP 5.x thuần và một số kinh nghiệm xử lý tình huống khi tiếp cận lỗi thực tế.

Trong bài này, chúng ta sẽ nói về những định nghĩa, kiến trúc của ZF như thế nào và làm cách nào để sử dụng Zend Application cấu hình thư mục tùy biến trên website của chúng ta.

ZF được xây dựng với một thư viên rất đồ sộ. Nên việc nghiên cứu và đọc hết tài liệu ZF là điều không đơn giản. Tuy nhiên, bạn cũng cần tìm hiểu những nguyên tắc hoạt động của ZF như thế nào.

1- Cách làm việc và xây dựng lớp trên ZF:

Chúng ta vẫn thấy ZF đưa ra tên các thư viện Zend_application hay Zend_Application_Bootstrap_Bootstrapper. Vậy làm với cách viết này, ZF hoạt động ra sao ?.

Trên thực tế, ZF dựa vào thư viện để đọc và làm việc trên các lớp một cách rất cụ thể. Bởi đường dẫn chi tiết của chúng đã được thể hiện rõ nét ngay trên tên của chúng.

Như vậy khi ZF đặt tên Zend_Application. Điều đó có nghĩa là nó gọi tới file Application trong thư mục zend.

Có nghĩa là: library/Zend/Application.php
Hay với tên: Zend_Application_Bootstrap_Bootstrapper
Có nghĩa là: library/Zend/Application/Bootstrap/Bootstrapper.php

Thật đơn giản phải không nào ?. Tuy nhiên, để can thiệp vào các thư viện này. Đòi hỏi bạn phải rất vững và hiểu thật rõ ZF, nếu không thư viện và ứng dụng của ZF sẽ bị hỏng khi các bạn sử dụng các thư viện.

2- Cài đặt Zend Framework và ứng dụng đầu tiên:

Đầu tiên, bạn cần tải toàn bộ source zend framework tại đây:
http://framework.zend.com/releases/ZendFramework-1.9.5/ZendFramework-1.9.5-minimal.zip

Ở đây, chúng ta sẽ sử dụng bản ZF mới nhất là 1.9.5

Xây dựng mô hình các thư mục như sau:
www/zfexam/application
www/zfexam/public/
www/zfexam/library

Tại thư mục library, bạn chỉ việc copy và thư viện zend, phiên bản mới nhất vào đây.

Thư mục pubic: bạn lần lượt tạo 2 file mới là: index.php và .htaccess
File index với nội dung như sau:


defined('APPLICATION_PATH')
|| define('APPLICATION_PATH',
realpath(dirname(__FILE__) . '/../application'));
defined('APPLICATION_ENV')
|| define('APPLICATION_ENV',
(getenv('APPLICATION_ENV') ? getenv('APPLICATION_ENV')
: 'production'));
set_include_path(implode(PATH_SEPARATOR, array(
dirname(dirname(__FILE__)) . '/library',
get_include_path(),
)));

require_once 'Zend/Application.php' ;

$application = new Zend_Application(
APPLICATION_ENV,
APPLICATION_PATH . '/configs/application.ini'
);

$application->bootstrap()->run();


Chúng ta chưa cần quan tâm đến mã nguồn như thế nào, bởi vì ỏ phần dưới chúng ta sẽ đi vào chi tiết từng dòng lệnh.
Trong file .htaccess lại tiếp tục copy và past đoạn code sau:

RewriteEngine On
RewriteCond %{REQUEST_FILENAME} -s [OR]
RewriteCond %{REQUEST_FILENAME} -l [OR]
RewriteCond %{REQUEST_FILENAME} -d
RewriteRule ^.*$ - [NC,L]
RewriteRule ^.*$ index.php [NC,L]

Thư mục application bạn lại tạo một số thư mục:
www/zfexam/application/controllers
www/zfexam/application/views
www/zfexam/application/models
www/zfexam/application/configs
Tại thư mục controllers tạo file:
www/zfexam/application/controllers/IndexController.php
www/zfexam/application/controllers/ErrorController.php
tại file IndexController.php copy nội dung sau:
class IndexController extends Zend_Controller_Action
{
public function indexAction()
{
}
}
?>


Tại thư mục views tại thư mục:
www/zfexam/application/views/scripts/index/index.phtml
www/zfexam/application/views/scripts/error/index.html
File index/index.phtml có nội dung như sau:

hello Zend Framework


Tại thư mục configs tạo file application.ini:
www/zfexam/application/configs/application.ini
Với nội dung:

[production]
phpSettings.display_startup_errors = 0
phpSettings.display_errors = 0
bootstrap.path = APPLICATION_PATH "/Bootstrap.php"
bootstrap.class = "Bootstrap"
resources.frontController.controllerDirectory = APPLICATION_PATH "/controllers"

Và tiếp tục tạo file bootstrap.php ở thư mục application
www/zfexam/application/bootstrap.php
Với nội dung:
class Bootstrap extends Zend_Application_Bootstrap_Bootstrap
{
}

Và cuối cùng chúng ta cùng chạy:
http://localhost/zfexam/public/
Như vậy, bạn đã viết ứng dụng đầu tiên bằng ZF rồi đấy.

3- Nguyên tắc MVC trên ZF:
Cũng như bao framework khác, ZF cũng hoạt động trên mô hình MVC.
Ví dụ xét liên kết:
http://qhonline.info/book/viewbook/
Như vậy book được xem là một controller và viewbook được xem là một action của controller đó. Tới đây chắc hẳn bạn đã tìm ra những điểm chung của ZF và CI mà chúng ta đã từng nghiên cứu rồi phải không nào.
Khi hoạt động, trong controller bạn sẽ khởi tạo những action một cách cụ thể, thông qua việc thiết lập phương thức một cách cụ thể.
class IndexController extends Zend_Controller_Action
{
public function indexAction()
{
}
}
?>

Như vậy IndexController cho ta Controller mang tên index và indexAction cho ta action là index.
Khi đó bạn bắt buộc phải khởi tạo trong view một thư mục ứng với controller là index trong scripts. Và file index.phml ứng với action là index. Để chúng hiểu được mô hình một cách cụ thể hơn.
Xét ví dụ khác:

class BookController extends Zend_Controller_Action
{
public function indexAction()
{
}
public function viewbookAction()
{
}
}
?>


Ở ví dụ này cho ta biết Controller là Book, 2 action là index và viewbook.
Như vậy, để chạy được ứng dụng. Bạn cần tạo thư mục Book trong view và file index.phtml, viewbook.phtml.
Cụ thể:
application/controller/BookController.php
application/views/scripts/Book/index.phtml
application/views/scripts/Book/viewbook.phtml

B- Zend View:

Ở bài trước, chúng ta đã làm việc sơ qua đối với mô hình view trong MVC. Tuy nhiên, những gì mà chúng ta thao tác chỉ là một phần cấu trúc của zend view. Để ứng dụng linh hoạt những thế mạnh của zend view, chúng ta cần tìm hiểu phương thức mà Zend View đang hoạt động như thế nào.
Trong ZF để xây thực thi và truyền tham số chúng ta cần sử dụng:
$this->view->tên_biến;
Và tại các thư mục view chúng ta chỉ cần sử dụng cú pháp: $this->view để lấy giá trị mà chúng ta đang truyền từ controller.
Ví dụ:
Trong controller index ta tạo action index với nội dung:
class IndexController extends Zend_Controller_Action
{
public function indexAction()
{
$this->view->string= "hello Zend FrameWork";
}

}

Trong thư mục view/scripts/index/index.phtml ta lại viết đoạn code sau:
echo "

".$this->string."

";
?>

Như vậy trong controller, ta truyền biến string thông qua mô hình view của ZF. Và gán nó với giá trị mình mong muốn. Tiếp tục, ở phần view chúng ta lại sử dụng biến khởi tạo ở controller. Bằng $this->tên_biến.

Bạn cũng có thể sử dụng một mảng lưu thông tin và sử dụng view để gởi thông tin của mảng ấy:

class IndexController extends Zend_Controller_Action
{
public function indexAction()
{
$data= array(
'title' => 'Zend Framework',
'author'=> 'Kenny',
'date' => '20-11-2009',
'rating'=> 'very Hard'
);
$this->view->info =$data;
}
}


Và trang view nhận giá trị của mảng này:

foreach($this->info as $k => $v)
{
echo "$k: $v
";
}
?>

C- Zend Layout:

ZF hỗ trợ người sử dụng bằng một số phương thức đặc biệt. Nó cho phép người sử dụng dễ dàng thay đổi thông tin hoặc giao diện của layout hoặc có thể khởi tạo cùng lúc nhiều giao diện trong hệ thống ZF.
Để sử dụng zend layout. Bạn cần cấu hình trong file application.ini thông số sau:
Trong phân đoạn [production] chúng ta thêm đoạn code sau:
resources.layout.layout = "layout"
resources.layout.layoutPath = APPLICATION_PATH "layouts/scripts"

Hai dòng này cho ZF biết thông tin về layout của chúng ta. Như vị trí đặt layout ở đâu và tên của file layout là gì.
Như vậy, ta có thể tạo thư mục layout trong thư mục application để giải quyết bài toán này.
Tại trang application/layouts/scripts/layout.phtml .bạn có thể cấu hình các thông tin như:
doctype() ?>


headTitle() ?>
headLink() ?>
headStyle() ?>
headScript() ?>


layout()->content ?>


Thông tin ở trên dùng để cấu hình các thông số như DOCTYPE, TITLE, LINK CSS,….của một tài liệu HTML.
Phần $this->layout()->content là phần hiển thị view trong mỗi action của chúng ta.
Như vậy trong controller, chúng ta sẽ chuyển nội dung file CSS đến layout thông qua zend view. Và đặt chúng trong hàm init(). Hàm init() là hàm đặc biệt trong cấu trúc ZF, nó sẽ được ZF ưu tiên gọi đầu tiên khi chúng viếng thăm bất cứ controller nào có mặt hàm init.
Như vậy ta có cách xây dựng như sau:

class BlogController extends Zend_Controller_Action
{
function init(){
$dir=$this->_request->getBaseUrl ();
$this->view->headLink()->appendStylesheet($dir.'/public/css/style.css');
$this->view->headLink()->offsetSetStylesheet(1, $dir.'/public/css/style.css', 'all');
$this->view->headLink()->prependStylesheet($dir.'/public/css/style.css', 'screen', 'lte IE 8');
}
public function indexAction()
{
}
}

Chú ý dòng :

$dir=$this->_request->getBaseUrl ();

Việc truyền tham số CSS, javascript,…., chúng ta phải sử dụng đường dẫn tương đối. Nghĩa là lấy ra đường dẫn hiện tại của người sử dụng rồi mới tiến hành truy cập vào đường dẫn thư mục của chúng. Trong trường hộp này tôi đặt file CSS trong thư mục public. Vậy một lần nữa ta có thể lấy được nội dung file css từ nó.

Như vậy, khi người dùng truy cập vào bất kỳ action nào của controller blog, chúng đều triệu gọi layout này giúp bạn rất rõ ràng.

Tuy nhiên, trong một số trường hợp chúng ta sẽ không thể lấy được thông tin từ getBaseUrl(). Nhất là với trường hợp cấu hình website phá vỡ kiến trúc chuẩn của Zend. Và lúc này bạn cần phải sử dụng controller để cấu hình điều hướng chính.

Lúc này trong file bootstrap.php, chúng ta phải viết phương thức _initControllers(). Đây là phương thức cho phép chúng ta triệu gọi đầu tiên, thường được dùng để cấu hình controller.

Như vậy ta cấu hình thông tin hàm như sau:

protected function _initControllers()
{
$frontController = Zend_Controller_Front::getInstance();

$frontController->setBaseUrl('/projects/myapp');
}
?>

Trong ví dụ này, chúng ta setBaseUrl mặc định sẽ là thư mục /project/myapp.


D- Zend Model:
Để sử dụng model trong ZF với kiến trúc ban đầu, trước hết bạn cần thiết lập ở file bootstrap.php với tham số sau:
protected function _initAutoload()
{
$autoloader = new Zend_Application_Module_Autoloader(array(
'namespace' => '',
'basePath' => dirname(__FILE__),
));
return $autoloader;
}
protected function _initDB()
{
$db = Zend_Db::factory('Pdo_Mysql', array ('host' => 'localhost', 'username' => 'root',
'password' => 'root',
'dbname' => 'zfexam'));
$db->setFetchMode(Zend_Db::FETCH_BOTH);
Zend_Db_Table::setDefaultAdapter($db);
return $db;
}

Hàm _initAutoload() có trách nhiệm sẽ chỉ cho ZF hiểu rằng bạn đang muốn load với namespace nào và đường dẫn thư mục ra sao. Trong trường hợp này, tôi gọi namespace= "". Vì cấu trúc mà tôi đang cấu hình trong ZF chính là cấu trúc mặc định chưa có module.
Hàm _initDB() là hàm dùng khai báo thông tin CSDL của bạn. Với định dạng là PDO (Hãy kiểm tra xem bạn đã bật PDO chưa nhé).

Tiếp tục trong models bạn chỉ cần khởi tạo class như sau:
class Model_Info extends Zend_Db_Table_Abstract{
protected $_name = 'test';
protected $_primary = 'id';
public function listinfo()
{
$data=$this->fetchall();
return $data;
}

}

Việc khai báo tên class cũng trở nên đơn giản hơn bao giờ hết. Lúc này, vì namespace ta để rỗng. Nên không cần gọi module ở đầu cho việc khai báo trong class.
Dựa vào tên class ta có thể hiểu: Models/Info.php.
Lưu ý: mặc dù thư mục trong cấu trúc của chúng ta là Models, nhưng khi triển khai trong ZF thì ta phải sử dụng là Model.
Trước khi sử dụng, ta cần khai báo cho ZF biết tên mà bảng chúng ta cần thao tác ở đây là gì. Cụ thể là bảng test, và với khóa chính là id.

Tiếp tục, tại controller ta chỉ cần khởi tạo action và gọi chúng như sau:

public function infoAction()
{
$model= new Model_Info();
$this->view->data =$model->listinfo();
}

Thứ Ba, 5 tháng 10, 2010

Hướng dẫn cài đặt The Network Simulator - ns-2

Huong dan cai dat The Network Simulator.zip (124,95 KB)
Đề thi và một số script môn Đánh giá hiệu năng mạng

Bài này dành cho các bạn học về môn Đánh giá hiệu năng mạng và một số môn liên quan đến mạng.
Mục đích:
Cài đặt :
- The Network Simulator - ns-2
- Tracegraph
- Nam
- gnuplot

Vì hầu hết các bạn đều muốn sử dụng Linux như một hệ điều hành thứ 2. Điều kiện ban đầu là:
- Có hệ điều hành windows có sẵn
Mục tiêu cài Dual boot Windows và Linux.

Chuần bị:
Để tránh những rắc rối về driver cho các bạn chưa sử dụng Linux lần nào bạn nên dùng 2 bản Linux dễ sử dụng nhất là Ubuntu hoặc Fedora.
(Bản Fedora và RedHat đã được test, bản Ubuntu cài đặt có vấn đề với X11, ko cài được xgraph)
Bản Ubuntu mới nhất là Ubuntu 7.10, bạn có thể download tại trang http://www.ubuntu.com/getubuntu/download hoặc mua đĩa.
Fedora bản mới nhất là Fedora release 8 (Werewolf) bạn download đĩa DVD tại http://fedoraproject.org/en/get-fedora hoặc mua đĩa DVD ngoài hàng (15k/đĩa)
Thông tin xử dụng về Ubuntu bạn có thể tham khảo tại mục Ubuntu trên blog của tôi hoặc blog saylinux.

Bước 1 : chia ổ cứng
Để cài Linux có khả năng làm việc tốt với môn này ở cứng nên để là 20GB, nếu bạn có ít ổ cứng thì để khoảng tầm 10Gb cũng dc.
Bạn dùng phần mềm PQMagic để chia ổ cứng không mất mát dữ liệu để tạo ra 1 phân vùng mới dành để cài Linux. (sử dụng PQMagic ntn thì bạn phải tự tìm hiểu big grin) . Nếu bạn có thêm một ổ cứng vật lý nữa thì quá tốt.
Để phục vụ OS Linux bạn cần chia thêm 1 phần nữa để làm swap cái này tối thiểu bằng RAM của bạn, ví dụ máy tôi 1GB tôi để swap 1GB. Cái này bạn chia luôn bằng PQMagic hoặc chia lúc cài Linux.

Bước 2 : cài hệ điều hành
Khởi động máy từ CDROM, nếu chưa chọn khởi động từ CDROM thì bạn vào BIOS để đặt lại.
Làm theo hướng dẫn của trình cài đặt. Đến phần chọn ổ đĩa cài đặt bạn nên chọn Manual nếu không biết bạn có thể mất hết dữ liệu trên ổ cứng (sợ chưa big grin)
Ở bước trên bạn chưa tạo swap thì ở bước này bạn tạo. Phân dùng cài Linux bạn để là ext3, đặt thư mục root / vào phân vùng đó và bấm next (như thế này là đơn giản nhất, các phần khác sẽ để OS tự chia).

Phần quản lý bootloader, là Grub hoặc LILO thường là Grub. Lúc này nó sẽ hỏi bạn chọn cái hệ điều hành nào là hệ điều hành mặc định khi khởi động, bạn chọn Widows hay Linux tuỳ bạn.
Đến phần chọn package thì bạn cũng chọn Manual, bạn kô nên chọn hết tất cả vì sẽ không cần thiết và chạy lại lâu. Các package cần thiết để phục vụ môn học là :
- Desktop Environments --> chọn GNOME, nếu bạn chọn KDE thì các cái sau này bạn sẽ phải chọn theo KDE
- Applications --> Engineering and Scientific --> GNUPlot
- Development : Development Libraries, Development tools, GNOME Software Development, X Software Development
- Base System : cài gần hết

Xong rồi bạn quay ra làm cốc cafe quay lại là nó cài xong.

Khi khởi động lại nó sẽ chạy vào HĐH mặc định, để chọn HĐH khác bạn bấm bất kỳ phím gì để vào Grub, sau đó bạn có thể lựa chọn.

Bước 3 : Cài đặt các phần mềm đã nếu trên
Link download các phần mềm trên: (bạn có thể vào trang chủ của nó để lấy)
http://jaist.dl.sourceforge.net/sourceforge/nsnam/ns-allinone-2.32.tar.gz
http://www.tracegraph.com/Tracegraph205_unix.tar.gz
http://www.tracegraph.com/mglinstaller.gz

Bộ ns2 nên chọn bộ allinone để cài cho đơn giản. Để có thể dễ dàng fix các lỗi như thiếu gói,... bạn nên có mạng.
Hầu hết các lỗi khi cài đặt ns bạn sẽ thấy ở đây http://www.isi.edu/nsnam/ns/ns-problems.html
Ví dụ bạn download ns về thư mục /home/guru/ các bước cài như sau.
bạn bận Terminal vào thư mục /home/guru/ bằng lênh
cd /home/guru/
Giải nén gói nsallinone:
tar -xzvf ns-allinone-2.32.tar.gz
Vào thư mục vừa giải nén:
cd ns-allinone-2.32
Chạy script cài đặt
./install

Sau khi chạy xong nó sẽ báo thành công.Nếu có lỗi thì xem tại đây
Nam has been installed successfully.

Ns-allinone package has been installed successfully.
Here are the installation places:

tcl8.4.15: /home/guru/ns-allinone-2.32/{bin,include,lib}
tk8.4.15: /home/guru/ns-allinone-2.32/{bin,include,lib}
otcl: /home/guru/ns-allinone-2.32/otcl-1.13
tclcl: /home/guru/ns-allinone-2.32/tclcl-1.19

ns: /home/guru/ns-allinone-2.32/ns-2.32/ns
nam: /home/guru/ns-allinone-2.32/nam-1.13/nam
xgraph: /home/guru/ns-allinone-2.32/xgraph-12.1
gt-itm: /home/guru/ns-allinone-2.32/itm, edriver, sgb2alt, sgb2ns, sgb2comns, sgb2hierns


----------------------------------------------------------------------------------

Please put /home/guru/ns-allinone-2.32/bin:/home/guru/ns-allinone-2.32/tcl8.4.15/unix:/home/guru/ns-allinone-2.32/tk8.4.15/unix

into your PATH environment; so that you'll be able to run itm/tclsh/wish/xgraph.

IMPORTANT NOTICES:

(1) You MUST put /home/guru/ns-allinone-2.32/otcl-1.13, /home/guru/ns-allinone-2.32/lib,
into your LD_LIBRARY_PATH environment variable.

If it complains about X libraries, add path to your X libraries
into LD_LIBRARY_PATH.
If you are using csh, you can set it like:
setenv LD_LIBRARY_PATH
If you are using sh, you can set it like:

export LD_LIBRARY_PATH=

(2) You MUST put /home/guru/ns-allinone-2.32/tcl8.4.15/library into your TCL_LIBRARY environmental
variable. Otherwise ns/nam will complain during startup.


After these steps, you can now run the ns validation suite with
cd ns-2.32; ./validate

For trouble shooting, please first read ns problems page
http://www.isi.edu/nsnam/ns/ns-problems.html. Also search the ns mailing list archive

for related posts.
Các bạn lưu ý sau khi cài đặt xong nó yêu cầu thêm PATH và LD_LIBARY_PATH. Để đỡ phải set các biến này mỗi lần chạy bạn thêm nó vào file .bash_profile đối với user bạn sử dụng.
Ví dụ tôi dùng tài khoản tên là guru thì file .bash_profile nằm ở /home/guru
Bạn có thể dùng vi để sửa:
vi /home/guru/.bash_profile

Việc cài đặt
http://www.tracegraph.com/Tracegraph205_unix.tar.gz
chỉ cần download và giải nén ra.
tar -zxvf Tracegraph205_unix.tar.gz
http://www.tracegraph.com/mglinstaller.gz
bạn download về, giải nén ra
gunzip mglinstaller.gz
Bạn sẽ thấy file mglinstaller --> đặt quyền thực thi cho nó và chạy:
chmod +x mglinstaller
./mglinstaller
Khi hỏi thư mục bạn đánh vào mgl
Ok, xong xuôi rôi!


Chạy thử vài ứng dụng nhé :
cd /home/guru/ns-allinone-2.32/xgraph-12.1/examples
xgraph Animation.xg


/home/guru/ns-allinone-2.32/nam-1.13/ex
nam lan.nam


Khi chạy gnuplot sẽ thấy:

Cấu hình nhiều card mạng trên máy VMWARE

Cấu hình 2 card mạng trên VMWare - có thể cấu hình 2 hoặc nhiều card mạng để tạo LAN ảo

Nối mạng giữa máy ảo dùng VMWare với máy thật và với Internet

chắc ít ai biết là trong các phần mềm tạo máy ảo thì phần mềmVMWare là một phần mềm rất mạnh và còn làm được nhiều việc khác nữa.Hôm nay tôi sẽ giới thiệu cho các bạn về một tính năng khá thú vị củaVMWare, đó là chức năng tạo các thiết bị mạng ảo (Net Card, Switch,Bridge).
Khi cài VMWare lên có lúc từ máy ảo chúng ta kết nối với máy thật đượcvà thậm chí có thể đi ra Internet được, nhưng đôi khi lại không thể kếtnối với máy thật được chứ đừng nói là đi ra Internet.
Bài viết này giúp các bạn có thể kết nối được máy ảo với máy thật ngaycả khi máy thật không có gắn Card mạng thật. Hơn nữa nếu máy thật cógắn Card mạng thật và đi net được thì các máy ảo cũng đi net được luôn!
Các bước cấu hình cho máy thật và máy ảo thông nhau (nối mạng và chỉa sẻ được dữ liệu được với nhau):
- Trước tiên các bạn cài đặt chương trình tạo máy ảo VMWare 6.0
- Tạo một máy ảo như bình thường và cài đặt hệ điều hành cho máy tínhảo này (Nếu các bước này bạn chưa làm bao giờ thì hãy chờ dịp khác tôisẽ Post bài hướng dẫn cài đặt và sử dụng VMWare, còn bây giờ mình tiếptục nhé) hoặc tạm thời có thể tham khảo bài viết này: http://www.ispace.edu.vn/forum/showt...2890#post42890
- Sau khi cài đặt xong hệ điều hành cho máy ảo bạn Shutdown nó và làm tiếp các bước sau:
+ Mở VMWare lên chọn máy tính ảo bạn muốn kết nối với máy tính thật và làm các bước sau:

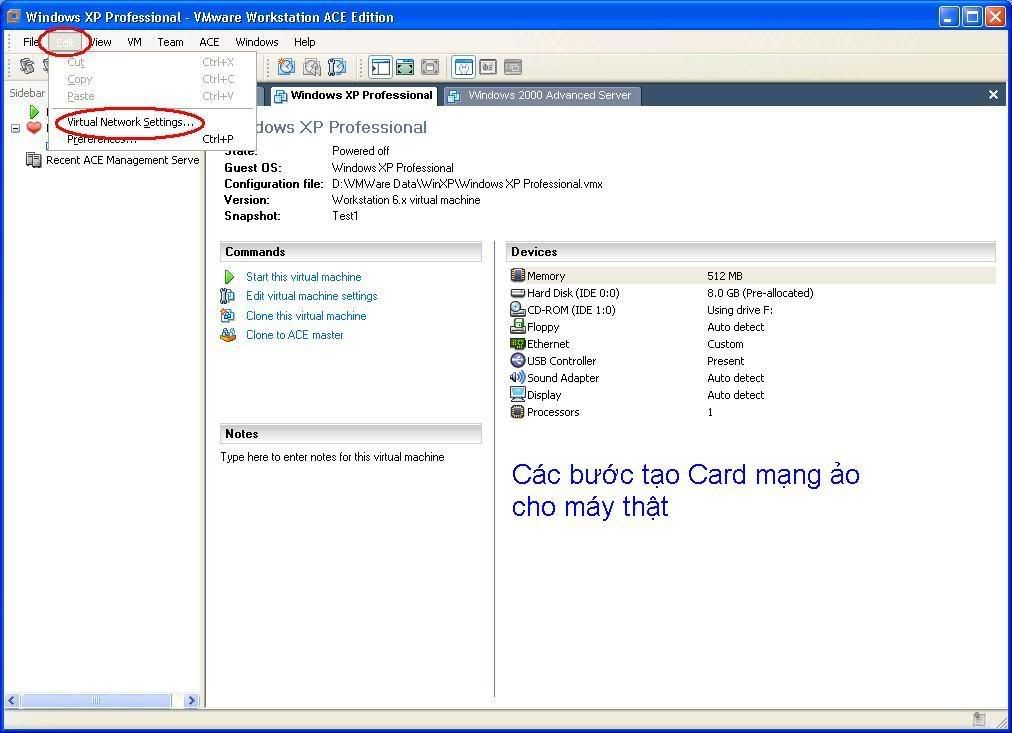
Chọn Edit > Virtual Network Settings > Host Virtual Adapters như 2 hình dưới:

Click this bar to view the small image.


Chọn Add...
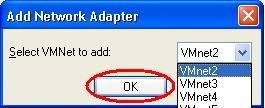
Ở ô Select VMNet to add bạn chọn Switch để gắn card mạng này vào.
VMWare đã tạo ra 10 Switch ảo cho chúng ta sử dụng nó có tên lần lượt là VMnet0 đến VMnet9
Ở đây tôi chọn VMnet2 như hình dưới:

Sau khi nhấn OK

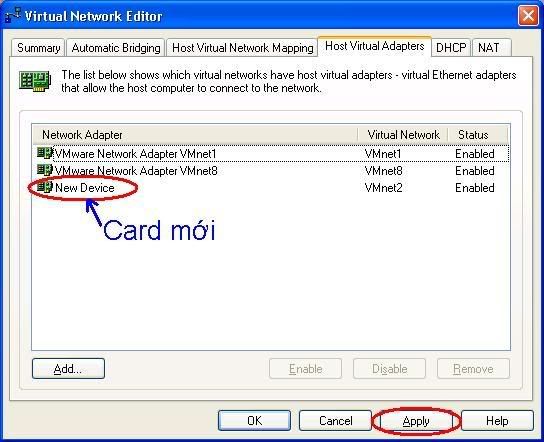
Sau khi nhấn Apply

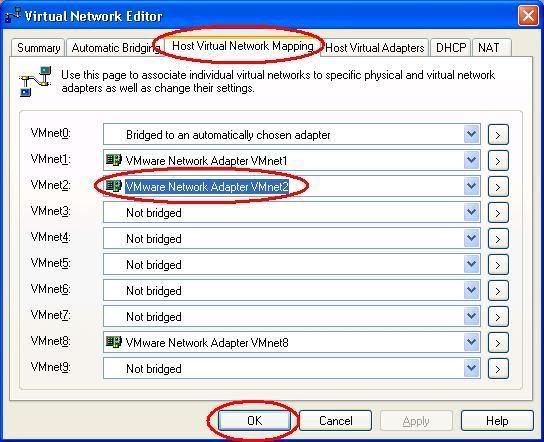
Sau khi nhấn Apply và đợi quá trình Add card mạng ảo thành công chúng ta chuyển qua Tab Host Virual Network Mapping
Thẻ này thể hiện các Switch ảo của VMWare (có 10 Switch ảo từ VMnet0-VMnet9)
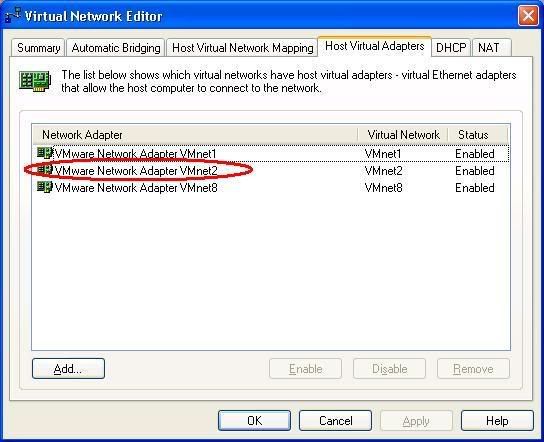
Và card mạng chúng ta vừa tạo ra được gắn vào Switch VMnet2 như hình dưới:

Sau khi nhấn OK bạn trở lại màn hình giao diện chính của phần mềmVMWare, chọn máy mình muốn kết nối với máy thật (ở đây tôi chọn máyđang cài Windows XP) chọn Edit virtual machine Settings như hình dướiđể thiết lập kết nối cho card mạng của máy ảo
Click this bar to view the small image.

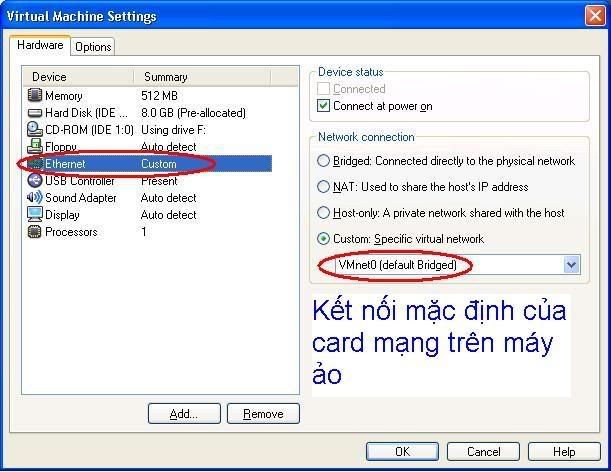
Card mạng của máy ảo mặc định được kết nói vào Bridge VMnet0 (nối theo kiểu Bridge vào Switch VMnet0) như hình dưới:

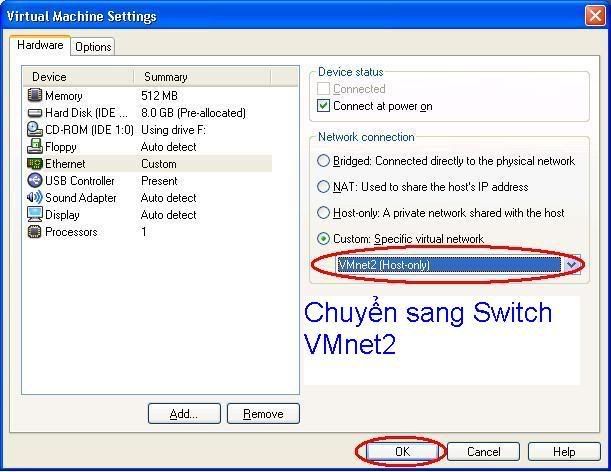
Do hồi nãy mình đã tạo Card mạng ảo "VMware Network Adapter VMnet2" cho máy thật và đã kết nối vào Switch ảo VMnet2 (Switch 2) của VMWare nên mình cũng kết nối card mạng của máy ảo vào VMnet2 (Switch 2) để giữa máy ảo và máy thật có thể thấy nhau như hình dưới:

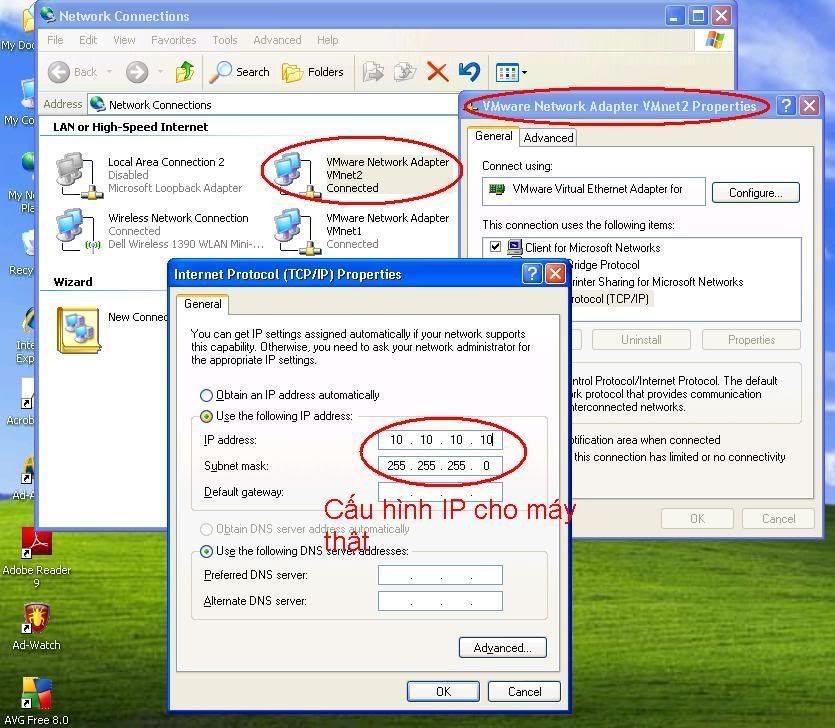
Sau khi đã kết nối cả 2 card mạng của máy thật và máy ảo vào cùngVMnet2 (cùng 1 Switch 2) thì chúng ta tiến hành cấu hình địa chỉ IP cho2 card mạng này như 2 hình dưới đây
Cấu hình Ip cho may ảo

This image has been resized. Click this bar to view the full image. The original image is sized 1012x733.

Cấu hình Ip cho may thật

Click this bar to view the small image.

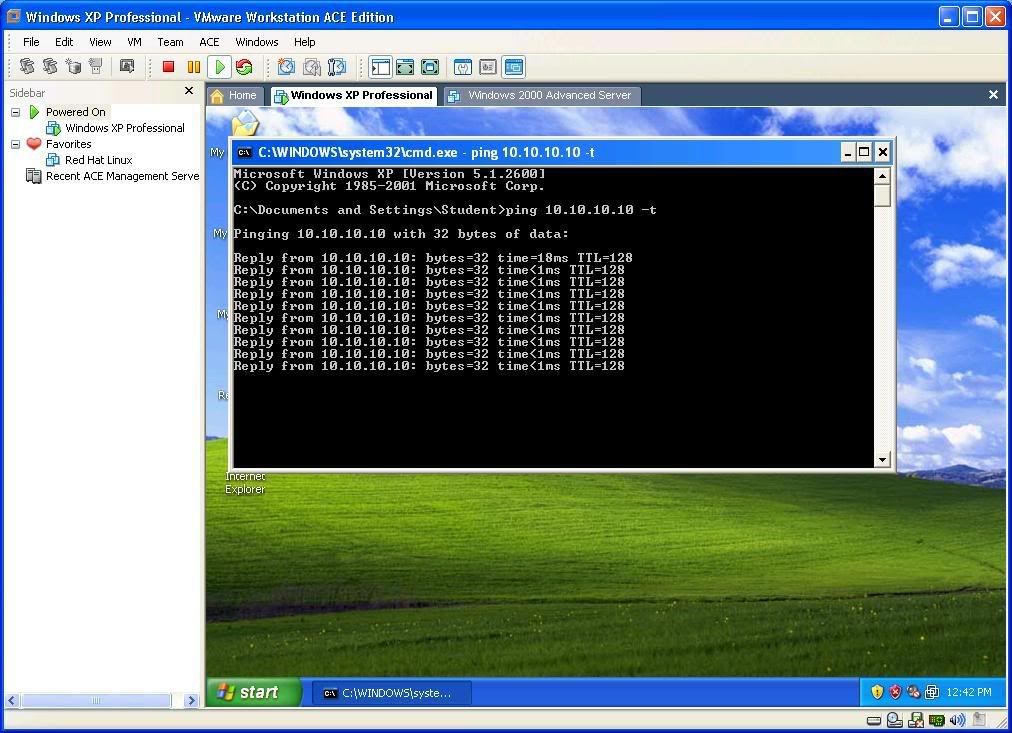
Như vậy là máy thật và máy ảo đã thông nhau. Chúng ta kiểm tra kết nốibằng lệnh Ping (nhớ là chúng ta đã đặt địa chỉ IP cho máy ảo là10.10.10.3 và IP của mấy thật là 10.10.10.10). Bây giờ mình sẽ đứng từmáy ảo đánh lệnh Ping 10.10.10.10 -t
Kết quả nhận được như hình phía dưới là OK.

Click this bar to view the small image.


Chúc các bạn thành công!
Tôi sẽ tiếp tục hướng dẫn các bạn kết nối thêm một máy ảo vào Switchnày nữa và kết nối cả 2 máy ảo cùng đi ra Inetnet vao tuần sau.
Chúc các bạn cuối tuần vui vẻ!

Đến hẹn lại nên! Sau đây mình sẽ hướng dẫn các bạn cấu hình cho máy ảo thông ra Internet như đã hứa tuần trước.
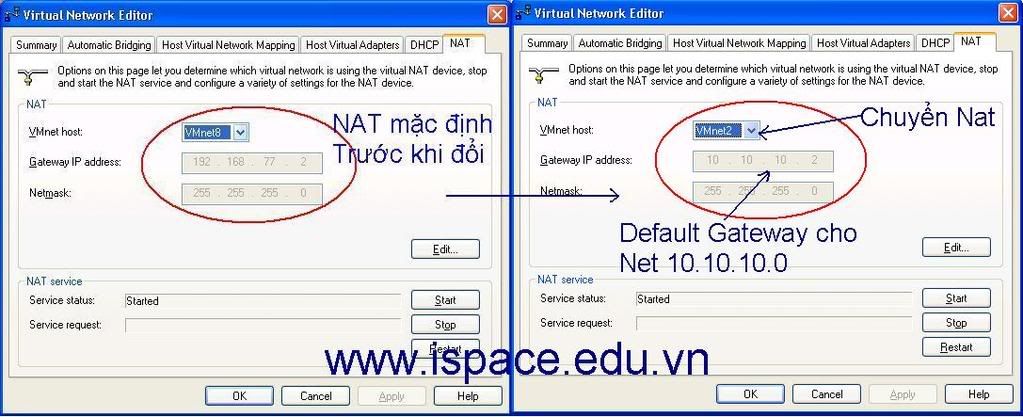
- Đúng ra thì mình có thể dùng cấu hình NAT mặcđịnh của VMWare luôn, nhưng ở đây tôi muốn các bạn thấy một điều là cácbạn có thể thay đổi NAT theo ý của mình.
- Bây giờ các bạn mở VMWare lên vào Edit >Virtual Network Settings > Host Virtual Adapters chọn NAT và làm nhưhình dưới (chúng ta đổi NAT mặc định từ VMnet8 sang VMnet2 mà tuầntrước chúng ta đã thêm vào)

Click this bar to view the small image.

- Các bạn để ý đến dòng Gateway IP Address ở phía bên phải của hình trên (có địa chỉ là 10.10.10.2), chúng sẽ dùng nó làm Default Gateway cho card mạng của máy ảo.
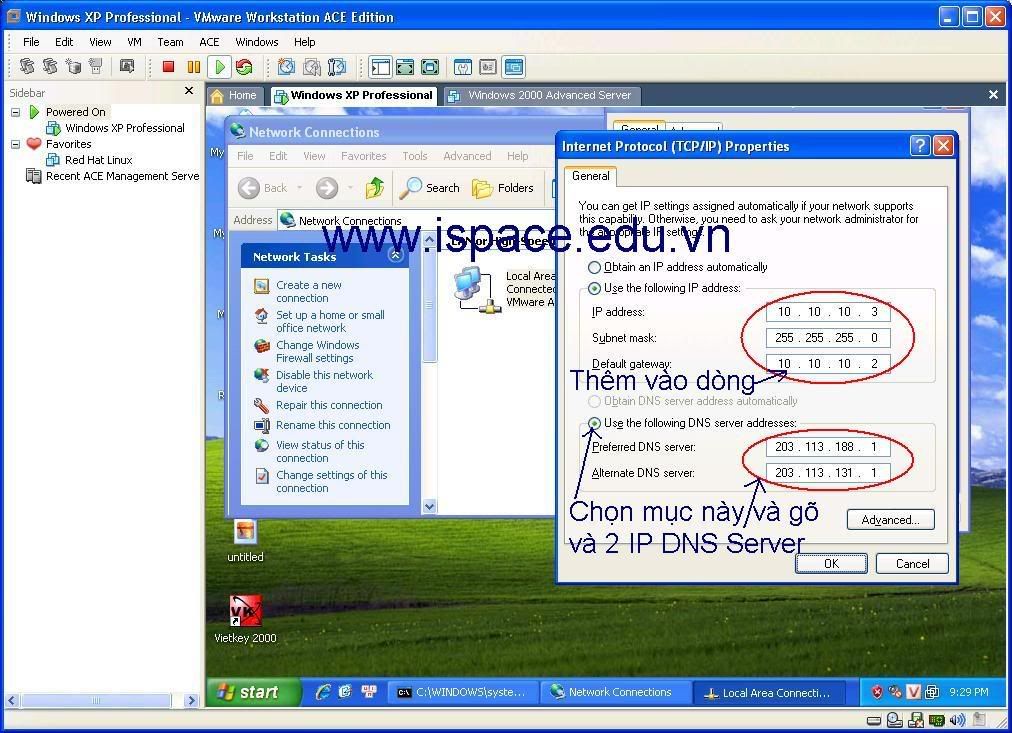
- Bây giờ bạn khởi động máy ảo Windows XP tuần trước bạn đã cấu hình lên và thêm vào các dòng như hình dưới:

Click this bar to view the small image.

- Trong hình trên bạn đánh vào 2 địa chỉ DNS server của nhà cung cấp, ởđây tôi dùng 2 DNS của Viettel (203.113.188.1 và 203.113.131.1). Bạn cóthể dùng DNS khác.
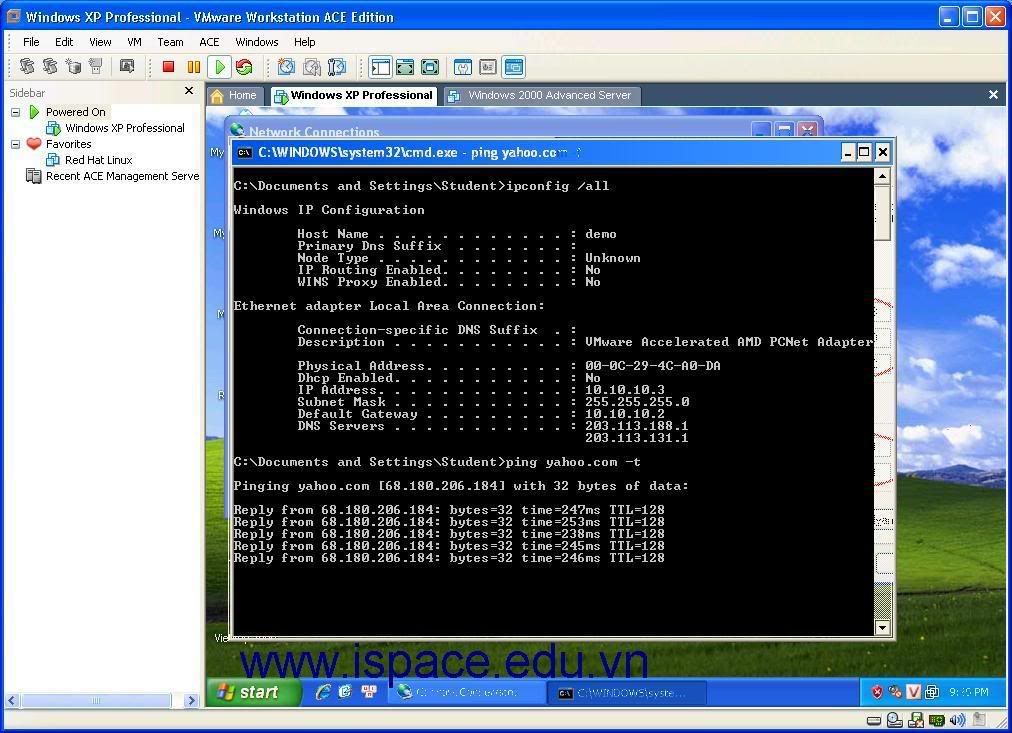
- Và đây là thành quả vất vả từ nãy tới giờ:

Click this bar to view the small image.


Chúc các bạn thành công!

Cấu hình SubNet cho một VMNet
Dưới đây tôi sẽ hướng dẫn các bạn cách cấu hình Subnet cho một Switch VMWare (VMNet)
Để cấu hình Sebnet cho một VMNet các bạn mở chương trình VMWare lên vào chọn Edit --> Virtual Network Editor...
Xuất hiện hình như sau:
Click this bar to view the small image.

Bạn click chọn thẻ Host Virtual Network Maping như hình, chọn VMNet nào bạn muốn cấu hình Subnet (VD: VMNet8), click vào dấu > bên phải và chọn Sebnet... như trong hình.
Xuất hiện hộp thoại như hình dưới:

Sửa lại Subnet như hình (VD từ 192.168.130.0 thành 192.168.131.0)
Sau đó vào NAT để kiểm tra kết quả về Getway IP address.
Kết quả thu được như hình dưới:
Click this bar to view the small image.

- Hình bên trái là Getway IP address khi chưa đổi Subnet
- Hình bên phải là Getway IP address khi đã đổi Subnet

Chúc các bạn thành công

Thứ Năm, 16 tháng 9, 2010

Hướng dẫn cài đặt cPanel/WHM

Để cài đặt cPanel/WHM cho VPS hay Máy chủ rất đơn giản, bạn có thể làm theo các bước sau.
1. Chuẩn bị:
- Máy chủ hoặc VPS đã kết nối mạng
- Đã cài đặt perl, gcc trên VPS hay Máy chủ: yum -y install perl gcc
2. Chú ý:
cPanel là chương trình quản lý hosting khá nặng, do đó cấu hình máy chủ (hay VPS) cần tối thiếu cấu hình sau:


Pentium hay AMD chipset 266 MHz

256 MB RAM (nên từ 1GB RAM trở lên)

Ít nhất 10GB ổ cứng

Nên sử dụng CentOS hoặc RHEL (Redhat Enterprise Linux)


3. Cài đặt: Sau khi login SSH bằng Putty hoặc các chương trình SSH Client mà bạn sử dụng, thực hiện các bước sau:


# cd /home
# wget -N http://layer1.cpanel.net/latest

#sh latest


Khi sử dụng lệnh "sh latest" hệ thống sẽ tự động cài đặt cPanel cho đến khi tiến trình hoàn tất (nếu không có lỗi trong quá trình cài đặt).

Sau khi quá trình cài đặt hoàn tất, bạn có thể đăng nhập vào WHM bằng cách sử dụng đường dẫn
http://[ip]:2086 hoặc https://[ip]:2087 để cấu hình.

If you are getting the following errors while updating cpanel ..

Checking Update System……..Your operating system’s rpm update method (yum) was not able to locate the glibc package. This is an indication of an improper setup. You must correct this error before you can proceed. Please correct the conflicts and try again!

To correct this problem, run the following commands:
*/yum check-update

[or]

* /bin/umount /var/tmp
* /scripts/securetmp
* /scripts/upcp –force <<<< important
* /scripts/easyapache

Thứ Tư, 15 tháng 9, 2010

Các bước cài đặt hệ điều hành CentOS 5

1. Cài đặt hệ thống centos cơ bản:
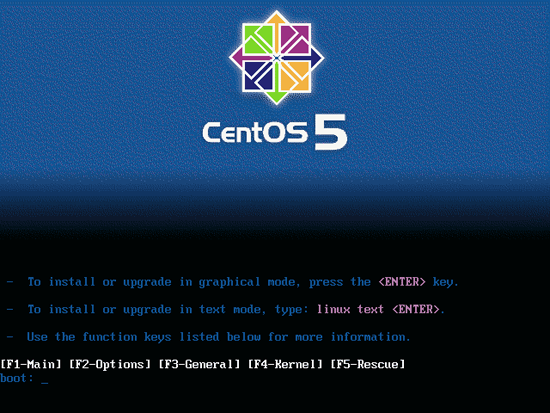
- Cho đĩa cài đặt của bạn và sử dụng quá trình boot từ CD-ROOM
Bạn ấn Enter để tiếp tục quá trình cài đặt ở chế độ đồ họa


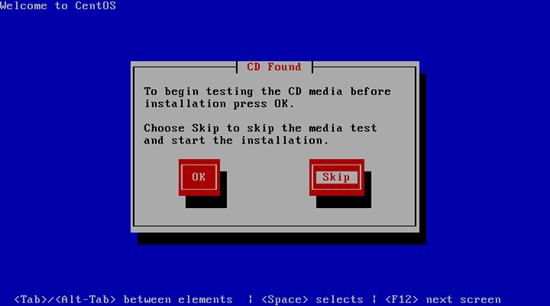
- Hệ thống sẽ yêu cầu bạn kiểm tra xem đĩa cài đặt có hoạt động tốt không
Nếu đĩa cài của bạn tốt chúng ta có thể bỏ qua quá trình kiểm tra


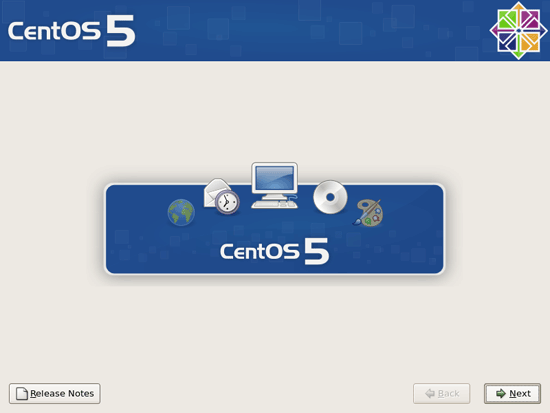
- Next tiếp tục quá trình cài đặt


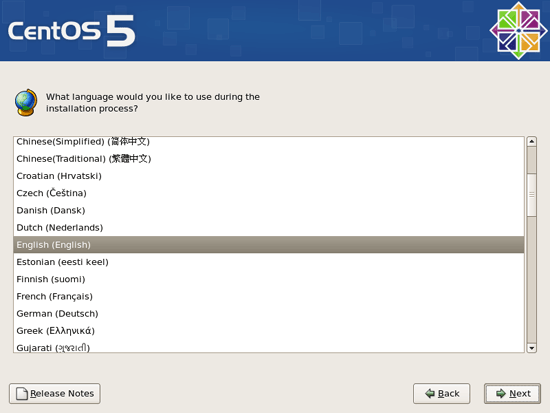
- Khâu tiếp theo là lựa chọn ngôn ngữ cho hệ thống
* CentOS5 đã hỗ trợ ngôn ngữ Tiếng Việt, ở đây mình lựa chọn Tiếng Anh


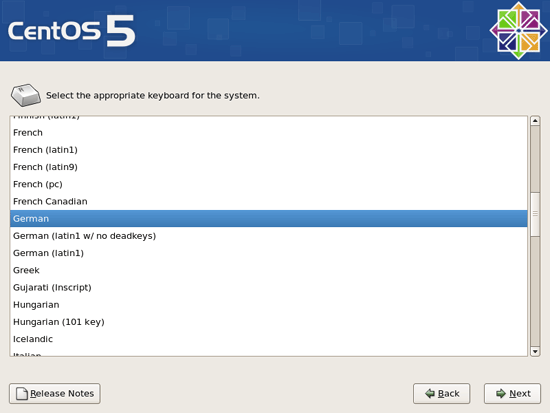
- Tiếp theo là lựa chọn kiểu bàn phím(Thông thường chúng ta sẽ lựa chọn bàn phím Tiếng Anh)


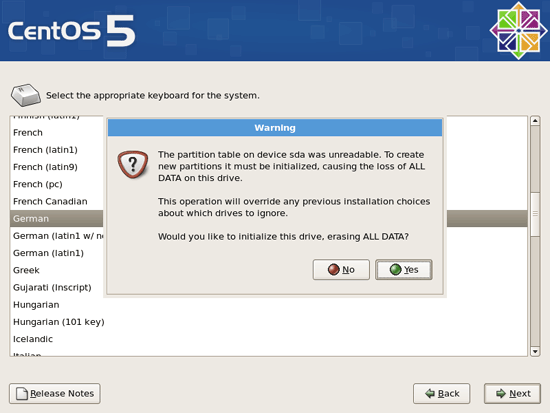
-Tiếp theo hệ thống sẽ đưa ra lựa chọn(Would you like to initialize this drive, erasing ALL DATA?), Ở đây mình cài đặt một hệ thống mới, lên mình chọn Yes


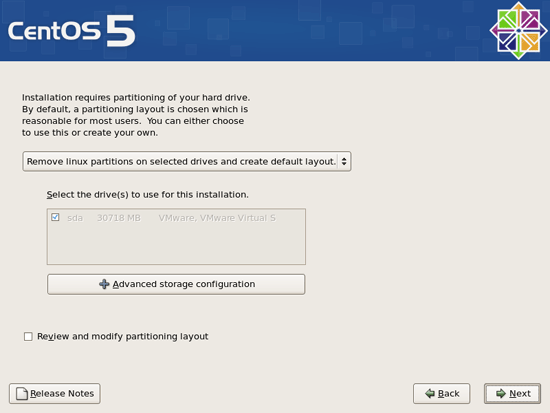
- Bước tiếp theo là lựa chọn cách thực chia phân vùng và định dạng file cho hệ thống, tôi khuyên các bạn khi cài đặt một hệ thống mới
và chưa có nhiều kinh nghiệm về cách phân vùng cho hệ thống Linux hãy chọn chế độ phân vùng tự động mà hệ thống đưa ra
(Remove linux partitions on selected drives and create default layout).

How to check infomation in Centos

*/check version
cat /etc/redhat-release for the CentOS version.

$ cat /etc/redhat-release
CentOS release 5 (Final)

*/check OS-bit
$ uname -a
Linux slave.DNS-HCM 2.6.9-42.ELsmp #1 SMP Tue Aug 15 10:35:26 BST 2006 x86_64 x86_64 x86_64 GNU/Linux
(64-bit)

# uname -a
Linux voice.localdomain 2.6.18-128.1.10.el5 #1 SMP Thu May 7 10:39:21 EDT 2009 i686 i686 i386 GNU/Linux
(32-bit)

"i686" means 32-bit. If it was 64-bit, it would be "x86_64"

*/service command - list running services

service --status-all
service --status-all | grep ntpd
service --status-all | less

*/Print the status of any service

To print the status of apache (httpd) service:
service httpd status

*/List all known services (configured via SysV)

chkconfig --list

*/List service and their open ports

netstat -tulpn

*/Turn on / off service

ntsysv
chkconfig service off
chkconfig service on
chkconfig httpd off
chkconfig ntpd on

*/check hardware information :

root@shell [~]# dmidecode | more

*/ check HDD
#df -h

*/ check Raid level

# cat /proc/mdstat
Personalities : [raid1]
md3 : active raid1 hdc1[1] hda1[0]
104320 blocks [2/2] [UU]

md1 : active raid1 hdc2[1] hda2[0]
61633280 blocks [2/2] [UU]

md2 : active raid1 hdc3[1] hda3[0]
8193024 blocks [2/2] [UU]

md4 : active raid1 hdc6[1] hda6[0]
1020032 blocks [2/2] [UU]

md0 : active raid1 hdc5[1] hda5[0]
5116544 blocks [2/2] [UU]

unused devices:

In this scenario, it shows that md had raid 1 installed.
Another command that will show us the state of the raid drives is "mdadm"

# mdadm -D /dev/md0
/dev/md0:
Version : 00.90.01
Creation Time : Thu Jun 28 16:43:40 2007
Raid Level : raid1
Array Size : 5116544 (4.88 GiB 5.24 GB)
Device Size : 5116544 (4.88 GiB 5.24 GB)
Raid Devices : 2
Total Devices : 2
Preferred Minor : 0
Persistence : Superblock is persistent

Update Time : Wed Sep 15 18:43:06 2010
State : clean
Active Devices : 2
Working Devices : 2
Failed Devices : 0
Spare Devices : 0


Number Major Minor RaidDevice State
0 3 5 0 active sync /dev/hda5
1 22 5 1 active sync /dev/hdc5
UUID : 506b9927:274e5bca:a1aa0988:48c7ded4
Events : 0.7769115

Rewrite url in php!


Iam using Apache. I want to rewrite url.
In url it will display: http://localhost/Ying/getrewrite/1/2.
But it redirect to: http://localhost/Ying/getrewrite.php?id=1&page=2

Step 1: Configure:

- Go /etc/httpd/conf and we configure for httpd.conf.
- Open file httpd.conf:
You find line: LoadModule rewrite_module modules/mod_rewrite.so --> delete "#" in head line to use this service.
Find line: Change AllowOverride None --> AllowOverride All.


Options FollowSymLinks
AllowOverride None


Step 2: We have 3 files and same directory:

- .htaccess (purpose: redirect virtual dir into real dir): To create this file, first open notepad, then create filename="" and extendsion: htaccess.
- rewrite.php (purpose: display link, call file getrewrite.php).
- getrewrite.php (file will be redirected).

Step 3: Content of our file:

- .htaccess:


RewriteEngine On
RewriteBase /

RewriteCond %{REQUEST_FILENAME} !-f
RewriteCond %{REQUEST_FILENAME} !-d

RewriteRule ^getrewrite/(.*)/(.*)$ Ying/getrewrite.php?id=$1&page=$2 [L]


Explain:
Line 1: RewriteEngine On
Line 3-4: Two lines will create requirement to server check path which user use really or not, before access it as virtual path. -d and -s are 2 sample values for checking REAL DIRECTORY and FILE. Use [OR] make it 2 in 1.
Line 5: Redirect real file. Syntax: RewriteRule Virtual_Dir Real_Dir
+ Syntax Virtual_Dir:
^ --> begin.
$ --> end.
getrewrite/(.*)/(.*) --> virtual_dir.

+ Syntax Real_Dir:
alias/filename.php?id=$1&page=$2

+ [L] --> set virtual_dir in url.

- rewrite.php:


href="getrewrite/1/2">url


- getrewrite.php:


echo "id: ".$_REQUEST["id"];
echo "page". $_REQUEST["page"];


Then now, you finish your rewrite url. Good luck!

Thứ Năm, 26 tháng 8, 2010

Packets - Sniffing & Analysis

Hi Guys Today Searching for the www ^^ i found a perfect tutorial for beginners that wanna know how to work with packets ^^ enjoy it

Credits = al_j From ElitePvPers.de not me ^^

Packets - Sniffing & Analysis

The tutorial was written by (al_j) for the elitepvpers-board.

:: Content ::

1. What do I need ?
^---> Download links

2. First arrangements
^---> Setting up WPE
^---> Setting up Windows Calculator

3. Sniffing Packets

4. Analyzing Packets
^---> The Structure
^---> Extended Structure Analysis
^---> The Encryption


-----------------------------------------------------


1. What do you need ?

Well at first you need the following things :

* Windows
* WPE - wpe09a_0delay.rar (Password : elitepvpers.de)
* Windows Calculator - well I guess you're using Windows
* A Hex-Editor, or notepad (I'll use HexWorkshop)


-----------------------------------------------------


2. First arrangements

Start WPE and go to View -> Options
and change the settings for "Winsock 2.0" like this :


Why ? Because if the app you will sniff packets on is using Winsock 2.0
WPE will capture them. Since as for default the winsock 2.0 settings are
disabled in WPE.


Ok now you start the Windows Calculator. Either using [WINDOWS-KEY]+[R]
and entering "calc" or starting it from your Startmenu and your Programs
folder. Now when the calculator is open go to View and change to "Scientific"
so you'll be able do deal with hexadecimal stuff.


-----------------------------------------------------


3. Sniffing Packets

Lets sniff some Packets.
Start any app, I am using the Internet Explorer in my example.
Now start WPE and select the Internet Explorer Process.

Click on the "Target program" button.


And select the Internet Explorer or iexplore.exe

Now we can start the sniffing clicking this button :


Now lets navigate the Internet Explorer to "www.elitepvpers.de/forum".

Ok now check the Gauge-Window to see if WPE really captured some packets.
So after the page fully loaded my Gauge looked like this :


This doesn't have to be the same for all of you, it can vary.

Now we can stop the sniffing using the red Stop-Button we all know from our
VRC-times ;D


Your WPE should now look like this :


Of course it doesn't have to look exactly like this.
So this is where you can view the captured packets.


I guess this is enough with sniffing, I guess you could sniff all apps,
games or whatever you want now.


-----------------------------------------------------


4. Analyzing Packets
The Structure

Well as for my examples I will use a fictive game. Since this should be an
universal tutorial and not only for one game. Please consider that I can't
write this tutorial for all games/apps and for all packet structures there
are on earth, just try to do it yourself.

Well lets say we have a game called "JungleBob Online" (although the name is
irrelevant, i just wanted to use the name ;D).

We start the game and wait for the login screen to appear. Now we start our
WPE application and select the JungleBob.exe and start sniffing packets.

Lets try to log in with "myusername" as username and "mypassword" as password.
Ok this username does not exist in our game and is not ours but we will use it
to test the packets.

Now stop the sniffing process and look at the first packet which was sent from
the client to the server.

Our packet should look like this :
(in WPE you will see the packet in HEX-Mode on the left, and the same packet
in ASCII-Mode on the right side)

22 00 11 00 6D 79 75 73 65 72 6E 61 6D 65 00 00 00 00 00 00 6D 79 70 61 73 73 77 6F 72 64 00 00 00 00 00 00

(i write it with spaces between every hex value so its easier to read)

So what do we know ? We used the username "myusername" and the password
"mypassword" and WPE tells us our packets size is 36.
Now lets check the bytes. When working with bytes you have to know that
theres a reversed byte order for values... means...
(I hope you know what hexadecimal is)
PS: For all the experts who want to flame me after i post this ... i
know its called Little Endian and Big Endian and has something to do with
the bit-order, but i don't want to explain it here... since this tutorial
is for "beginners".

If you have a decimal value 1 the normal hex value will be 01.
If we have a 2 byte delimiter (called WORD or 16bit integer) the value will
look like 00 01, if we have a 4 byte delimiter (called DWORD or 32bit integer)
it will look like 00 00 00 01.

So thats the normal byte order, if we have the reversed byte order everything
is ... yeah ... reversed.... so our value will look like this :

(as 2 bytes)
original : 00 01 reversed : 01 00

(as 4 bytes)
original : 00 00 00 01 reversed : 01 00 00 00


So now lets check our login-packet again.

22 00 11 00 6D 79 75 73 65 72 6E 61 6D 65 00 00 00 00 00 00 6D 79 70 61 73 73 77 6F 72 64 00 00 00 00 00 00

As we know most values are either displayed as 2 or 4 bytes we can
start checking our login-packet.

The first 2 bytes look like a value.

22 00

reversed : 00 22

Start your calculator and change the view from Dec(standard) to Hex.
Now enter your hex value 0022 (of course without the spaces).
Now change the view to Dec again and you see our value is 34.
Lets check the packet-size again ... WPE is saying our packet is 36
bytes long. Do you see the parallels ? Our packet-size minus our 2
bytes at the beginning = 34.
So the first 2 bytes are indicating the packet length that will follow.
(It has not to be this way ... the length can be on the 4. position
or somewhere else...)
In my example the 2 bytes which are indicating the length aren't
included in the length, that's because some games which use encrypted
packets are doing it also this way, cause they do encrypt all the bytes
excepting the packet length (in most cases the first 1, 2 or 4 bytes).
But you shouldn't care about encryption now, since our packet seems to be
sent in plain text. You know that cause when you look at the ASCII-Mode
you see our username and password we used before.

Ok What we know is the first 2 bytes indicate the packet length. But
what about the rest ? Well since I'm doing this for a long time know in
most cases the next few bytes are a command or the "packet-header" (its
not a real "header" but i just call it this way). How to test this ?
Just sniff another login-packet in our game and change the username and
password you enter to something else (no matter what). The value should
not change.

Ok now we know 11 00 is our command (or "header"). You don't have to
deal with this 2 bytes in dec, its just a hexadecimal header used for
the packet protocol the developers created for the game. Like 11 00 is
the login 12 00 is the getserverlist-packet and so on, you got what I mean ?

Wow we already discovered so much now lets continue. We look at the
ASCII-Mode and it seems to be that the next value is our username
"myusername" but whats that ? There are so many 00s following our
username in the HEX-Mode.
Why's that ? Well most games have a limit for the username and password
the user can enter. In most cases its either 12, 16, 24, 28 or 32
characters of length.
So for an easier packet protocol they set the length of the buffers or
variables for the username and password static ....
Like if our buffer has a length of 5 and we write "lol" into it the buffer will look like this :

6C 6F 6C 00 00


So now we know how the login-packets structure looks like :


2B = 2 Bytes
4B = 4 Bytes
XB = X Bytes

22 00 11 00 6D 79 75 73 65 72 6E 61 6D 65 00 00 00 00 00 00 6D 79 70 61 73 73 77 6F 72 64 00 00 00 00 00 00

.2B
.2B .16B .16B


So thats the basic guide to analyze a packet. Well the thing is you
will have to deal with a lot of values...
Like you login and the server responds with some 4 byte values... just
write them onto a piece of paper and check the next packets which are sent.
So you can discover their function. Like the server responds with a 4
byte sessionID which the client next sends to the character server to
authenticate himself, and so on.


4. Analyzing Packets
Extended Structure Analysis

Ok since some people told me such a login-procedure is kinda easy I'd
like to add an extended structure analysis chapter here. In the following
example I will show (or simulate) a login-procedure with serverresponses
and finally the "worldlist selection". Well since most mmorpgs use
more than one servers or "worlds" I will try to show you here, how
most of the stuff is done basically.

Well we start right under the login-procedur we analyzed in the
chapter above. Now lets assume we sent our login packet.
So now we're waiting for the server to respond. What do we know ?
If our login is false, the server has to tell that the client
so that the client can give us an error message, else it will
give us an ok and let us through.

Now lets again assume we sent our login packet and received a
packet from the server. Wow whats with the client ?
It says wrong password, did we type something wrong?
Lets check the packet (which could look like this) :

04 00 12 00 02 00

.2B
.2B .2B

So thats the packet the server sends us, telling the client
the password is wrong. I already colored the stuff we learned
in the above tutorials.
But whats the last 2 bytes for ? Well thats probably a flag, telling the
client whether the login was successful or not. Just do some checks and log
in with some fictive username which does not exist in the game and the
packet could look like this :

04 00 12 00 01 00

Now the client tells you "This Accountname is not available, please register first."

So now we surely know, the last 2 bytes is the login-flag.
You can again reverse it and transform it from hex to dec using your
calculator. Basically you don't have to do it since you already see
what values it'll be, but if you're still not that good in hexadecimal use
the calculator.

So thats the flags we know for now :

original : 01 00 reversed : 00 01 dec : 1
original : 02 00 reversed : 00 02 dec : 2

So thats basically a server variable transformed into a WORD ( 2 bytes ).
So when we have a successful login the flag maybe 00 00 and would tell
the client "hey the login was successful, go on". But since we still don't
know what the flag would look like when we had a successful login,
we go on and test it.

Log in with your username and password and the server
responds something like that :

08 00 12 00 00 00 C6 6F 5D A1

.2B
.2B .2B .4B

So what do we know ? The first two bytes indicate the length.
Next is the header, then the flag (which seems to be 0 in dec)
and some DWORD (4 bytes) value. I already colored the stuff we know once again.

Ok what could this new value be ? We still don't know...
Lets reverse it and transform it into dec using our calc.

original : C6 6F 5D A1 reversed : A1 5D 6F C6 dec : 2707255238

Wow whats with this value ? Well we don't know it yet ... lets go
on with our packet analysis... Just write down the original 4 bytes
and look for it in the next packets. So we could be able to
analyze the function of this 4 bytes.

Get ingame and redo, or continue the sniffing.
Ok now we have the worldserver-selection screen in our game.
Lets check the new packets we captured.
Mh the client seems to send something to the server after our
above packet (12 00). Well that could be a request
to get the worldserverlist.

The packet looks like this :

02 00 13 00

Seems to be nothing great in here, just the length and
the flag. Thats the way the serverlist is requested by the client.
Next we see a packet we received from the server. As you probably can see
in the ASCII-View in WPE there are some strings in plain text,
prolly the servernames. Let's see what we got :

39 00 14 00 03 54 68 65 20 4A 75 6E 67 6C 65 00 00 D9 D0 2C 12 D0 07 54 68 65 20 42 65 61 63 68 00 00 00 D9 D0 2C 13 D0 07 54 68 65 20 4C 61 6E 64 00 00 00 00 D9 D0 2C 14 D0 07

Wow thats our first long packet. WPE shows our total size 59.
And the first two bytes tell us 57.
So you remember the total size - 2 (the first two bytes) = the length of our data.

Well lets see, what do we know ?
We see the length, and the header, but what is next ?
Check the ASCII-View in WPE again. There are three names in plaintext...
The Jungle, The Beach and The Land. Thats our servernames.
So we have 3 servers. Now it seems that the 5. byte of the packet ( 03 )
tells us how many servers we got in the list.
We have 3 here so the hex for 3 is 03. So after this servercount we already
have our servername "The Jungle", but whats that ? There are those
00s again. Well that means the same we had before with our username
and password, you remember ? It seems that the maximum length of a
servername is 12 (use the ASCII-View and the HEX-View parallel in WPE to count it)
thats why the unused place is filled with 00. So what do we know, what
information does such a server list has to store ?
Well it has to tell the client the name of the server, the ip and
the port where the client should next connect right ?

Well most IPs are sent as 4 single bytes, some servers also send
them as plain text. Lets assume our server sends it using a DWORD.
What would this look like... well let's do an example.
We have the IP address 212.178.67.42.
Now you split it into 4 independent values :
212 178 67 42 (so just "remove" the dots).
Now every single value will be converted into hex using our calculator.

212 = D4
178 = B2
67 = 43
42 = 2A

So our DWORD (4 bytes) is D4 B2 43 2A.
(do not reverse this!, since its 4 single values and not ONE big value)

So basically what did we do ?

212.178.67.42
^
|-Remove the dots
v
212 178 67 42
^
|-Convert every single value to hex
v
D4 B2 43 2A

Now lets check our packet again... whats after the servername.
Well in such cases you just have to play around with the values.
Pick every byte and convert it ... either byte for byte
(to see if its an ip address) or 2 bytes at once (reversed!) or 4 bytes
at once (reversed!). So after we played around a bit we found out
that the next 4 bytes after the servername indicate the ip address.
Lets check it.

D9 D0 2C 12
^
|-Convert it to dec
v
217 208 44 18
^
|-Add the dots
v
217.208.44.18

Well that seems to be an IP-address, if you're not sure, just ping
it or something else. Well... we already got the servername,
the ip... but whats with the port ?
Check the next bytes of our packet, there are still 2 bytes
left until the next servername begins.
Well the maximum value a port can have is 65535, thats basically
the maximum value a 16bit-integer (also called short or word) can be.
Type 65535 (dec) into your calculator and convert it to hex.
What do we have here ? FF FF - Two bytes, huh ?
Well it seems we found our port value.
The 2 bytes after the ip-address seems to be our port.
Lets convert it (remember : thats a normal value again, so we have to reverse it)

original : D0 07 reversed : 07 D0 dec : 2000

The port of the first worldserver seems to be 2000.
So I guess you could do the rest of the packet on your own...
Now let's collect all data we found and build a structure
(I'll basically do it with collors in here)


39 00 14 00 03 54 68 65 20 4A 75 6E 67 6C 65 00 00 D9 D0 2C 12 D0 07 54 68 65 20 42 65 61 63 68 00 00 00 D9 D0 2C 13 D0 07 54 68 65 20 4C 61 6E 64 00 00 00 00 D9 D0 2C 14 D0 07

.2B
.2B .1B
{ //for every servercount :
.12B .4B .2B
}


So the serverinformation we can gather from this packet is :
(I'll use "--" as delimiter, no real function for that, if you wonder)

Servername -- IP -- Port

The Jungle -- 217.208.44.18 -- 2000
The Beach -- 217.208.44.19 -- 2000
The Land -- 217.208.44.20 -- 2000


Ok now lets get back to the game, choose a server and sniff the packets.
(Thats the last packet I'll discuss here lol)

Now after you've chosen the server, the client connects to this
(see ip and ports we found out above) and we get the character list.
But lets see what really happens after the client successfully
connected to the worldserver.

The client seems to send a packet to the worldserver.

06 00 15 00 C6 6F 5D A1

Oh whats this ? This is our value from above that we got from the server
after we successfully logged in, remember ?
And now the server sends it again to the worldserver ???
Well yeah, thats kinda an authentication-method most mmorpgs use.
Look... you log in using "John" as username and "12345"
(irrelevant in my example) as password. Now the server checks whether this
information is right or not. In our example ... if the information IS correct,
the server generates a DWORD ( 4 bytes ) or 32bit Integer value stores
it and sends it back to the client. Thats called sessionid
(most websites which have a login-interface also use this kind of
authentication, but of course if can vary).
Now after the client has chosen a worldserver he would like he connects
to it and sends his sessionid.
Well since the login server and the worldserver are "seperated from each other"
(or basically two different applications) the world server does need
this value to check whether someone really logged in before and got
this sessionid. Since the loginserver stored our sessionid
(in a database or whereever) the worldserver just checks whether
the sessionid is available.
Normally the sessionid is deleted when the client disconnects
from the game, the server or whatever.

Well ... now thats the part where I stop. I won't update the encryption chapter
since its basically the same for everything. If you know how to decrypt one
packet, you basically know how to decrypt every packet of one game.


4. Analyzing Packets
The Encryption

Well I won't be writing to much in here, since you can't tell just
from looking at the packets what kind of encryption it is. Well of
course you can, but not in all cases.
I will just write some hints down.

Like lets assume we capture a login-packet of a mmorpg.
(remember our login packet from above ?)

You shouldn't be able to read your username or password in
ASCII-Mode now anymore.

At first do some checks, like the one with the first 2 bytes beeing
the length and so on. Well next you can redo the sniff at the login
process and see if the bytes do change ( of course use the same
username and password as before ). Using that method you can say
whether the encryption is static or not. Next do the checks like
the one sniffing more login packets where you use fictive
usernames and password which vary in length and see if some
values change.

Well now you could do some basic analysis. Like lets assume we
have a login packet which looks like this
( we used the username and password as before "myusername" and "mypassword") :

22 00 66 77 1A 0E 02 04 12 05 19 16 1A 12 77 77 77 77 77 77 1A 0E 07 16 04 04 00 18 05 13 77 77 77 77 77 77

Now we see the first two bytes and do the length check.
Ok its works, it seems to be the packet length.
Now do the check with the other username and passwords...
You will notice that the first four bytes do not change.
That means starting from the 5. byte there is our
username and password data.

I hope you know how to use a HexEditor for the next steps
(well thats what I do, you can also use notepad).

Lets write down the packet beginning at the 5. byte
It looks like that to me, using HexWorkshop :


So we see there are some bytes beeing 77 ...
Seems to be strange huh ?

Lets write down our username and password under the exact
positions of both values
(the 77 does seem to be placeholders, since their the same everywhere right?)
My Hex-Editor looks like this :


Wow whats that ? Our username and password does exactly fit
into the encrypted packet data.

Well that could be a XOR-Encryption ( Exclusive or - Wikipedia, the free encyclopedia ).
How to test it ?

Start your calculator (the windows one ;D) and be sure "Hex" is checked.
Now type in the first byte of the value which could be your username.
In our case its 1A. So we type 1A into the calculator. Now we
look at the line under the encrypted data, and see that 6D in
hex stands for a "m" in ASCII.
Now when you already typed 1A into your calculator hit the XOR-Button...


then type in our hex value for "m" (6D) and hit enter.

Our result is 77. Strange isn't it ?
Now lets do the check.
Take the next byte of our encrypted data. In our case its 0E.
Type 0E into the calculator, press the XOR-Button, type 77 and hit enter.
You should get 79 now which is the hex value for "y".
Well it seems we have a static XOR-Encryption using the key 77 here.
So you'll be able to decrypt all the packet data of our game using
the XOR method and the key 77.


An implementation into a programming language could look like this
Code:


Well thats the end of my tutorial. I hope it's not to complicated and I
didn't mix up to much things. I hope you enjoyed it.